It’s very important to set the white balance manually on any drone to get the ideal footage and more importantly on any of your DJI drone in the DJI fly app. This small trick will change the drone footage entirely. So even if you are new or a pro drone pilot you can always change the white balance settings to get the best drone footage. This applies to DJI Mavic 3 classic, DJI Mavic 3, Mini 3 Pro or even the Exo and Autel drones. Although for the autel drones it could be slightly different. But the point is here we must remove the auto white balance settings and set them manually which I have shown in this drone white balance tutorial how to change the settings and get the ideal footage.
Auto White Balance
When we buy our new drone we mostly film in auto white balance settings and apparently nothing is wroking with that. Today’s drones can still do a great job while shooting on auto white balance and the results could be stunning. But still there’s one settig that we need to change– white balance. If we do not change white balance settings it will destroy our footage quality. Here is the example that shows how we can change these settings which impacts the overall performance of our drone footage.
Shooting With The Auto White Balance Settings on The Drone
When we shoot on our drone with the auto white balance when there are too many different colors the drone footage. You will see the difference when you are shooting for a variety of colors let’s say while shooting fall in NYC. If you go to the timeline after shooting you will notice the drone tries to adjust the white balanace and gradually it mixes up all the colors at some time. (Just shoot a 2 minute reel and see it on your drone). The same way if you shoot on a cloudy day, and then the sun comes up, again the footage seem very unnatural and messy. So you need to add manual white balance before shooting on your drone color profile. The point is we must change white balance settings once manually and let the other settings stay automated.
Which Camere Drones Auto White Balance Affects?
This is a general rule of thumb. If you leave white balance to auto it is going to ruin your footage on any camera drone be than Exo drones, Autel Nanos, DJIs or even GoPro cameras. We have seen it a lot done on every camera that is used to shoot while on the go and involve a lot of gimble moment. It may not appear when the camera does not have to move a lot. On DJI drones such as Mavic 3, Mavic 2, Air 2s or even mini 3 pro, the white balance needs to be changed accordingly.
There are two different ways to access the white balance settings on our drones just down the bottom right hand corner you will see a little icon that says Auto. You can switch that into Pro mode and down there at the bottom you will also see it shows the current white balance and right beside it shows a tiny sign that it’s in the automatic mode that means the white balance is going to adjust as you would fly in different scenarios and the lighting conditions automatically.
How to Change White Balance Settings on DJI Drones
Here’s how we can change white balance auto settings to manual on DJI drones. What we need to is to
1- First click on the drone menu
2- It will show us tools where we can adjust the settings
3- Click on the settings
4- When we click on settings right at the top it will show white balance and you will see it set to Auto
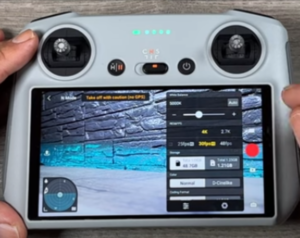
5- Then disable that and then adjust the white balance settings
6- Just slide it where it shows 2000 Kelvin and you can see it gives it a very blue tone or we can slide it all the way up to 10 000 Kelvin and you can see now it
You will notice it has a very orange kind of yellowish Hue to it. A good rule of thumb if you are not quite sure what to set your white balance to is 5500K that’s the middle of the that and it looks great. In the most lighting conditions it would look good of course if you do want to fine tune it a bit you can use that plus and minus arrow to achieve that. You can also change it to go up to 5600Ks. However if you love warmer touch to your footage you can turn it down even down to 5000Ks that might satisfy you as it appears nice. However our best settings for white balance are at 5500Ks just setting. So if we set it to that we everything works just great no matter how conditions change it will bear great results.
There’s an other way to change the white balance settings
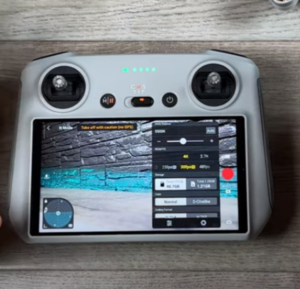
1- Go to settings by clicking those three dots at the top right hand side
2- Just go over to camera and scroll down you will see an option for white balance
3- You will see it set to Auto we can switch it over to manual
4- Move the slider ball to move it up and down and the menu will go away

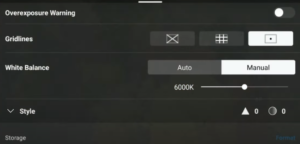
You can also see what the color temperature is going to look like so you need to see what you want from your footage or how you want it to look. You can always fine tune these settings. While shooting during the fall you can set the white balance to around 6K so that all leaves and trees will look slightly popped up and make the footage look exceptionally well executed.
Best Drone Settings For High Quality Footage
There are few small changes that will make the footage outstanding.
Sunset/Sunrise – So when you you are shooting in sunset/sunrise keep the a ittle more warmth will help the footage look amazing.
Snow/Winter Drone Settings – Snowing is the time of year when we need to change our drone color profile a bit as there’s a lot of white snow and sunlight remains absent that adds a little more yellowishness to the footage. So to remove that yellowish effect from our drone footage during the wintry season we need to keep the warmth low everything else will work exceptionally well.
Settings for Night – When shooting during the night a little less of warmth or choosing the white balance at low will be more of use to get cool imagery.