Here are the best DJI Mini 3 pro settings and tricks to get ideal videos and photos captured on your drone. If DJI Mini 3 pro is your first drone these beginners tips will help you fly it like a pro pilot. Most of these tips are very common but when we are flying the drone we tend to forget the ideal settings for the most part. So make sure to follow them before flying your drone.
Connect Mini 3 Controller to The Internet
Before doing anything the first thing that the new drone pilots require is connecting the RC to a wifi hotspot to access live maps. Without an internet connection the maps would not work.
To do that:
1- Turn on Wifi Hotspot on your iPhone. On the phone you need to go to the settings/personalhotspot/allowotherstojoin/maximize compatibility
2- On the controller go to the settings on the top left corner/wifi/enterpassword
You can also do the same on android by going into the settings and connecting to the internet.
Turn on Obstacle Avoidance Feature
After connecting the DJI Mini 3 Pro to an internet connection, turn on obstacle avoidance. DJI Mini 3 pro has three settings for obstacle avoidance.
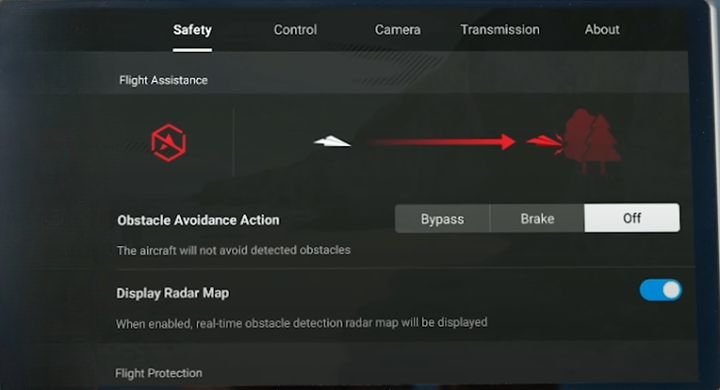
Go to the DJI Fly App/Safety/Bypass to trigger bypass obstacle avoidance
Off- If we set it off, it will not take any action but rely thoroughly on our intelligence to avoid it or it can collide with the obstacle.
Brake – If we choose Brake the drone will stop while detecting an obstacle.
Bypass – It will bypass the obstacle. We need to choose Bypass to keep flying while getting into trouble. The drone will smoothly bypass the object and continue flying.
Practice RTH Feature First
Being a new pilot it’s essential to make sure all the functions on your drone work properly or at least you understand them. So when flying for the first time, after flying a short distance do press RTH to be on the safe side. In case of the losing connection to the drone. Once checked we can fly the drone without interruption and return home whenever we wish to.
Extra Gimbal Rotation For Creativity
Handling a Gimbal affects the quality of footage a great deal. DJI Mini 3 Pro allows upward rotation to the fullest to capture the super shots.
The best way to use gimbal rotation is by trying transitions on two separate clips. For the first clip, start flying towards the subjects while the gimbal facing the horizon, then slowly pan the gimbal towards the sky with the help of scroll wheel on the back of the controller. While for the second clip, the gimbal should face towards the sky. Start flying forward and slowly bring the gimbal toward the horizon to reveal the new subject.

Then put both the clips on the editor, tap the cut when both the clips face the sky. That’s all. This way the new pilots can use unobstructed gimbal rotation for creativity.
Using Vertical Mode For Social Media Videos and Photos
We can use the vertical mode button on Mini 3 Pro for our ease but what if the button is already missing either if you are tracking the subject or you are in the quickshots mode. In both these cases you will find it missing.
Just toggle the Normal Mode and you will see the Vertical Mode button reappear. The same can happen while using the activetrack. Turn it off to see it reappear on the screen.
Vertical Mode is a great feature to capture footage solely for sharing on social media. One of the common problems while sharing photos and videos on social media is we need to crop them. The vertical Mode solves that problem for us. We can use this feature to capture videos and photos for social media without compromising the quality.
Initially vertical videos were captured to fly the drone further away so that the subject is in the centre and remains intact while cropping the video that also compromised the video resolution while cropping.
In the DJI Mini 3 pro we can use vertical mode to capture amazing vertical videos and photos for social media without compromising on the quality. So if you are a new pilot it’s highly recommended to check out vertical mode.
Using HDR High Dynamic Range Feature on Mini 3 Pro
If you are a new pilot HDR is a highly recommended feature to use on Mini 3 pro. HDR or High Dynamic Range gives much better looking videos. In a single shot photo mode the DJI mini 3 pro can recognize the same and automatically enable the HDR for a better dynamic range.
In the video Mode we can use HDR only at 30fps at least or less. It will indicate that on the screen that you can use HDR on 30fps or 25fps etc. So if you want to record videos in HDR mode make sure to record on those frame rates.
Smooth Zoom
The new pilots also need to understand how to use smooth zoom while tracking. For better quality you can use smooth tracking on the DJI Mini 3 pro controller. When you are not tracking you can simply tap on or two times and the camera will zoom in once or twice.
If you are using tracking mode, you can still use a smoother zoom. Just tap the same way on for zoom and slowly the camera will zoom. This will allow you to get really dynamic image quality. Then push in or out of the subject for cinematic results when tracking the subject.
Repositioning drone while Using ActiveTrack
We can always reposition the drone while using ActiveTrack. You may or may not know that it actually works before or even during the tracking. While tracking if you want the drone to move further away or raise it further high, we can use that while using the sticks on the controller. The drone will roughly stay at a higher distance. The DJI Mini 3 pro will keep tracking while we make these new changes on the go which is great while using the tracking.

Spotlight Mode
We can use spotlight mode on our Mini 3 pro while recording ourselves. In the spotlight mode the drone won’t automatically move in the air. Instead it will rotate the gimbal and keep you in the frame. You might already know that you can manually fly the drone in the spotlight mode and the drone will still keep you in the frame. This means you can move the drone for cinematic and advanced moves by making simple tweaks on the controller that will also allow you to record in good quality.
Best Photo Settings on Mini 3 Pro
It’s highly recommended to understand the separate settings for different quality of images. For instance for sharper photos using single photo mode while for the larger photos 48MP mode needs to be used. We can use smart photo mode for much sharper looking photos on mini 3 pro as compared to 48mp mode. It also depends on what you want your photos to use.
For prints or larger photos in general 48 megapixel mode gets better photos. But it’s always better to use smart photos for social media sharing which is a great feature in mini 3 pro. You can still use 48MP mode for social media but that requires a few tweaks to get the best results, hence to avoid the hassle of that, use smart photos mode which is great for Instagram etc.
Best Shooting Time
There are two different intervals which allow us to get high quality footage than any other. Either fly your drone at sun-rise or sunset. Both the times are ideal for the best photos and videos. Most of the high quality photos and videos that we have seen recently have been shot during these times.
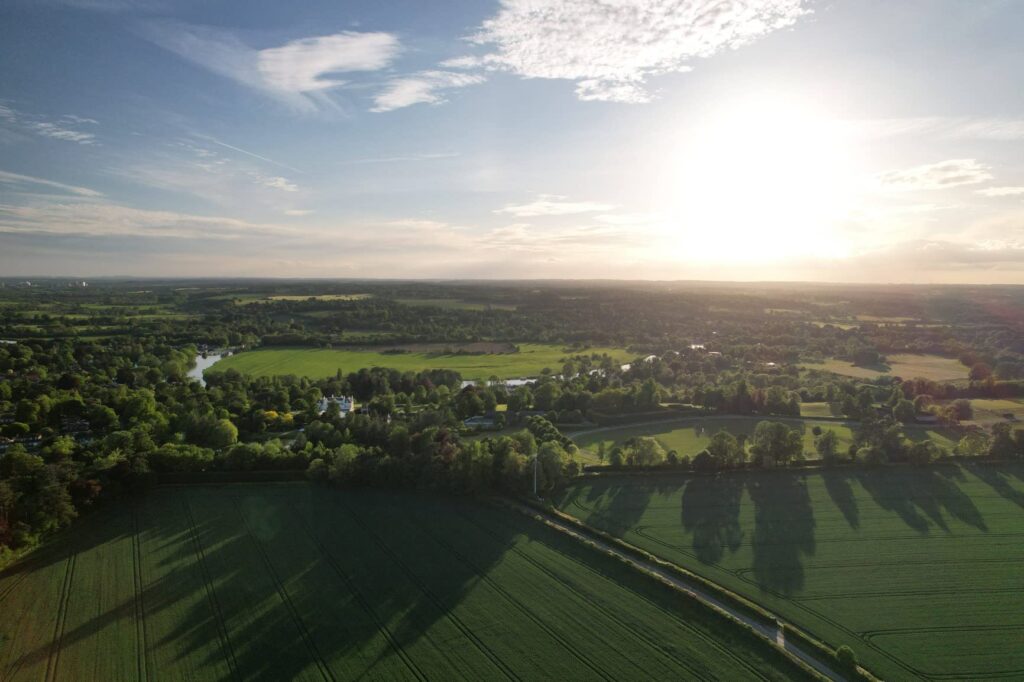
While recording during any other time of the day, specially during noon time the footage has harsh shadows and landscapes that spoil the footage while we see shadows all around the subjects.
On the other hand, morning and evening lights produce much better videos and photos. If we record during the sunrise or sunset the footage is just mind blowing. Even if you are using any lower quality drone than Mini 3 pro, still the footage will be crisper during those two times.
However, if you want to shoot during any other time, make sure it’s a cloudy day or the area is shady already to capture the videos in softer light.
Fly Forward or Backward?
Make it your common practice to fly the drone forward even if you are returning it home. Technically, that’s how they are manufactured in the first place. Even though we can fly them backwards, they are faster and smooth when flying forward. So even if you are returning it Home, make sure to turn it around first and fly forward for the best performance.
Framing & Exposure
We know the tools are available for framing and exposure so it’s better to use them. We can use Gridlines for turning the framing on, and it’s easier this way. These gridlines can be used to composite footage in a better quality.
It’s also highly recommended to turn on Overexposure Warning from the RC of Mini 3 Pro to know when the exposure is more than enough. This will highlight the areas with overexposure in zebralines. Also use Histogram to make sure that you are capturing the footage on the right space.
Conclusion
Make sure to follow these small steps to become a pro drone pilot. These tricks are not just restricted to mini 3 pro most of them are applicable to other drone models as well. So make sure to record in the best settings to make the most of your drone and time.
Try Mini 3 Pro Today
Affiliate Links