DJI Air 2s has become a new sensation for all the drone lovers alike yet it’s equally important to understand its features in the fly app to make use of them properly. However, at the same time it needs skilled flyers to use their DJ Fly App which pretty much works as a real driving wheel powered by a throttle. So the new buffs with the latest DJI Air 2S or even pros who are upgrading from their previous drones will find this DJI Air 2S minimalistic drone flying guide very helpful and they will understand the mechanics of it like a pro.
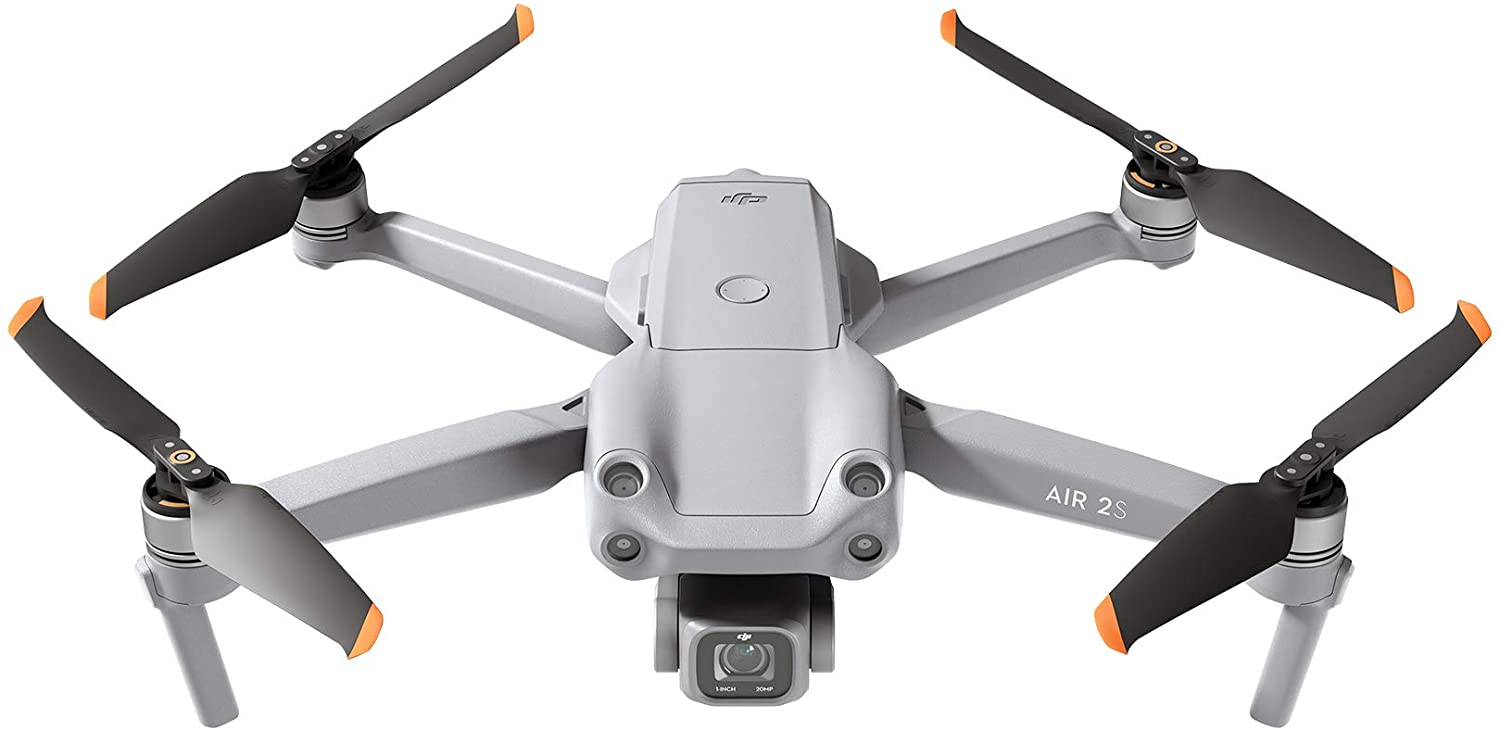
- 【1-INCH IMAGE SENSOR】Equipped with a 1-inch image sensor and large 2.4μm pixels, DJI Air 2S is capable of...
- 【MASTERSHOTS】The next evolution of QuickShots, MasterShots is an advanced intelligent feature that gives users...
- 【THE CENTER OF ATTENTION】FocusTrack features Spotlight 2.0, ActiveTrack 4.0, and Point of Interest 3.0, making...
This guide is very helpful for those who are just starting into flying a DJI drone. There’s a lot of useful information in it for you. We are going to throw these pro drone flying tips quickly so let’s just jump right in it.
DJI AIR 2S Horizon Adjustment Auto/Manual
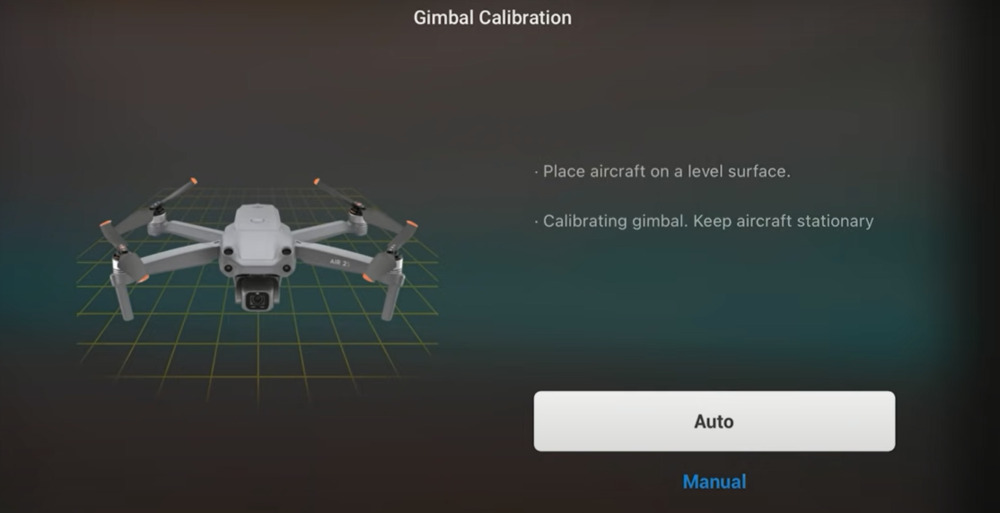
First of all you need to understand how to manually adjust your horizon if you are having problems with a crooked horizon. Of course if you are at home you can go ahead and do a gimbal calibration. Just make sure you are on a flat level surface.
However if you are already up in the air flying, DJI has built in some manual tools to help you straighten out the horizon.
- So click on the three dots, go to control and you can see there it lists gimbal calibration.
- Click on gimbal calibration you can see it shows two options–auto and manual.
- Use the auto
- If we are flying up in the Air and click manual instead of Auto, it shows us some tools to straighten up. We can adjust the horizon; it’s basically side to side.
- Once we are done we can just close the x and our horizon problem should be fixed.
DJI Air 2S Fly App Settings Drone Exposure Adjustment
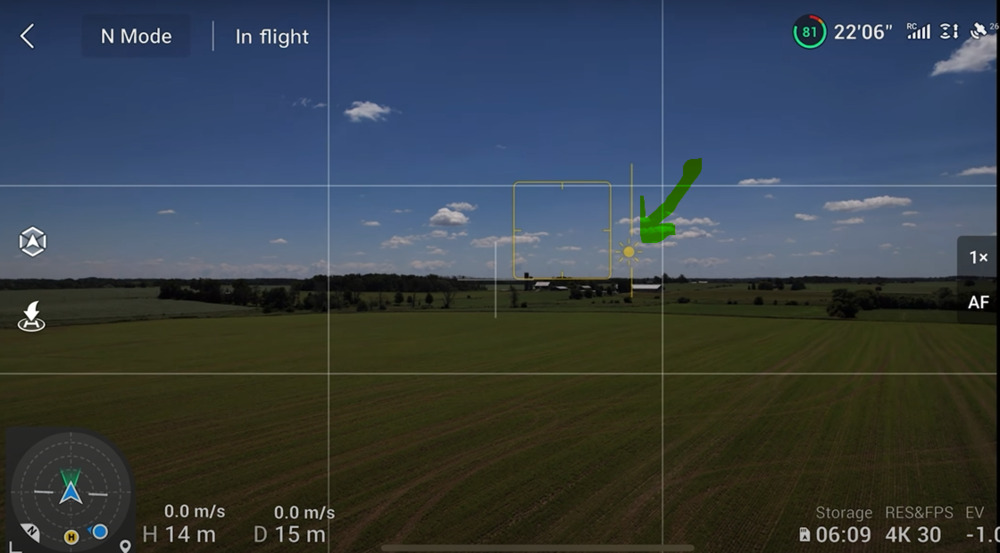
We can actually adjust the exposure of DJI Air 2s drone through app controls. So, basically, if we click on the screen at any point we will notice its little box that we can actually grab that sun which is a sliding point and slide. It adjusts the ev compensation down the bottom right so it’s just another quick and easy way that you can set your ev compensation.
Gimbal Calibration Best Settings in DJI Air 2S
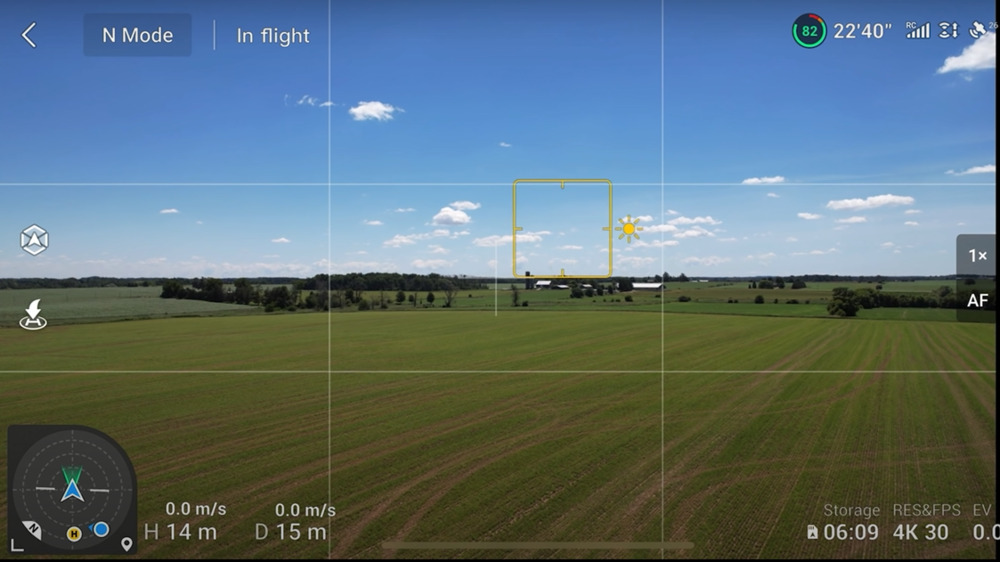
We can actually move the up-down arrow to move around the gimbal but also from side to side by pressing and holding on the screen. If we put our finger on it we can drag around and go up. But we can also go side to side. This small change in fly app will help you make it work for your best drone shots.
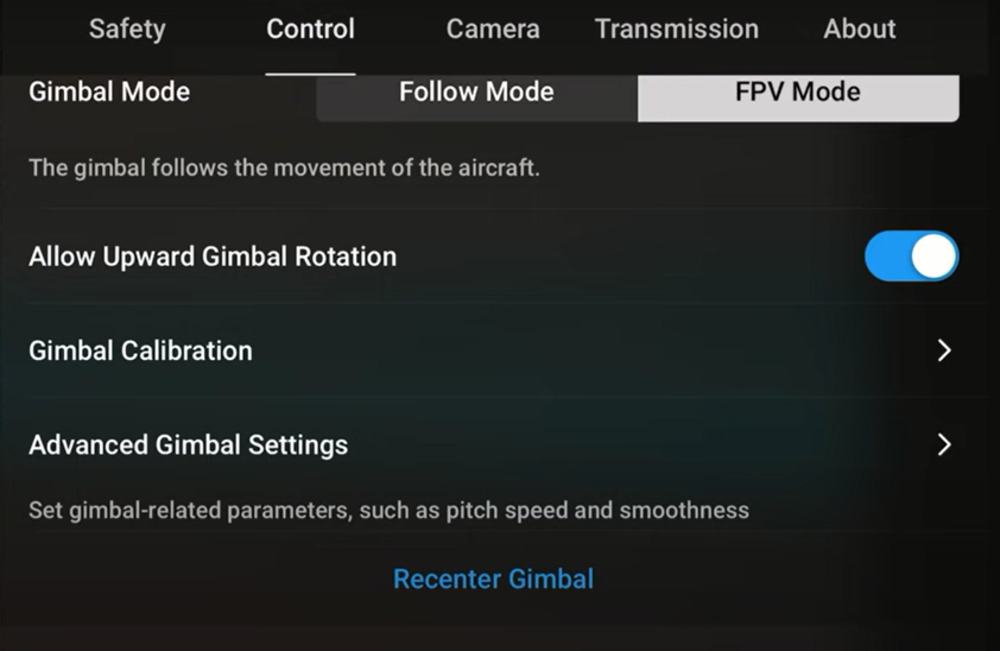
Enable Upward Gimbal Rotation
So basically what upward gimbal rotation does is it allows the gimbal to look up a little bit. In order to enable that we need to go into settings control, scroll down a little bit and there we can see we have the option for allowing it. We need to just turn it on. Once it’s enabled we will see it there.
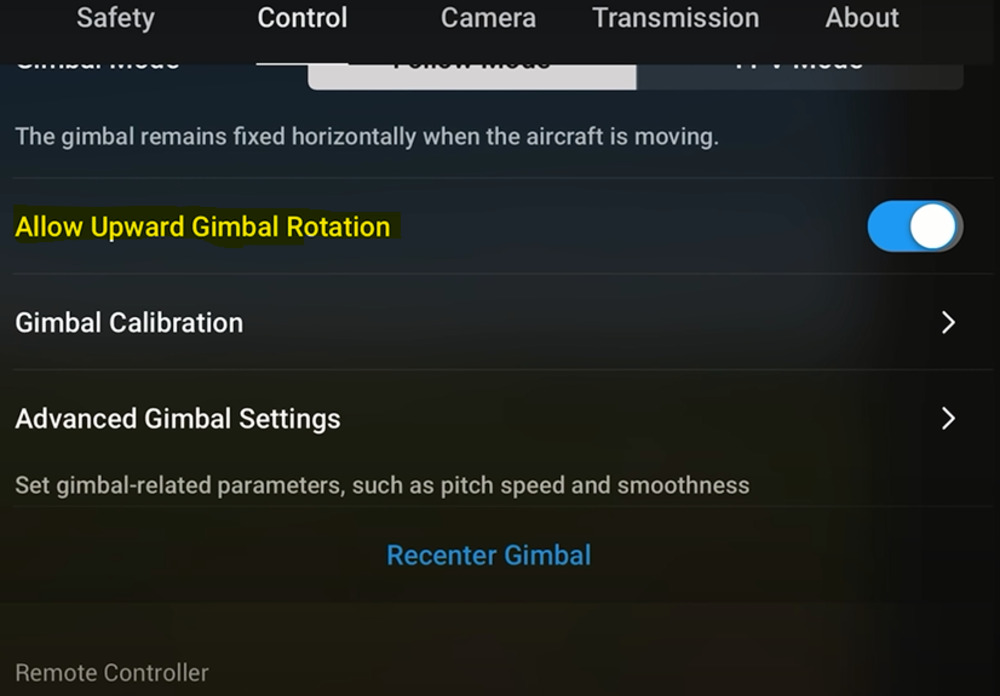
The only thing we need to keep in mind is if we accelerate at a high rate of speed the gimbal is going to jump back down. But as a whole it’s an awesome tool to have this control setting enabled on your list.
Toggling DJI Air 2S Gimbal to FPV Mode
We need to set the gimbal to FPV mode by clicking the dots at the top right corner and we will do so again to make sure we are in the control section. We will see there under gimbal mode we have follow mode which is there but we will also have FPV mode as the traditional FPV look. We will see that the horizon will kind of match the movements of the drone and it can give us some really dynamic looking shots.
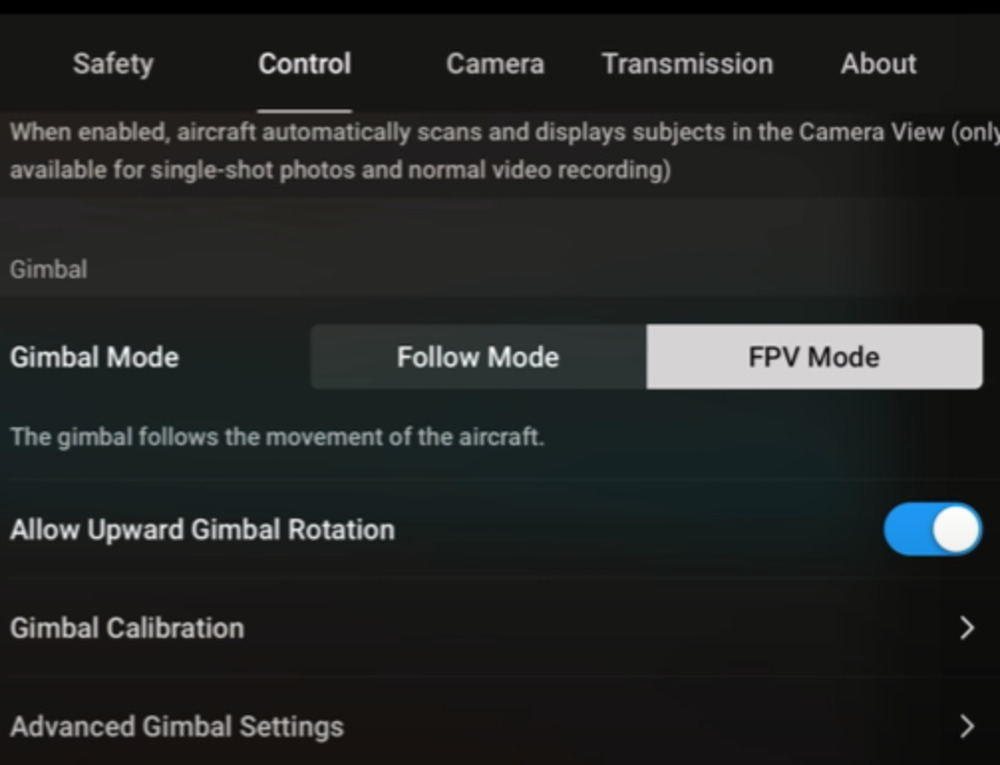
To mix into it takes a little while to master that mode to make it look good but definitely it’s something to go in and try out as FPV mode has its own classic beauty for desired shots.
Setting Up Width, Height and Length for The Best Drone Shots in Fly App
It’s really a tricky business capturing the best DJI Air 2S drone shots, some of which we have seen getting highly rewarded being the best. There is a hack to film a master drone shot. We can actually set the width, height and length that’s going to dictate how much the drone moves around up in the air and it can really change the look of the final shot.
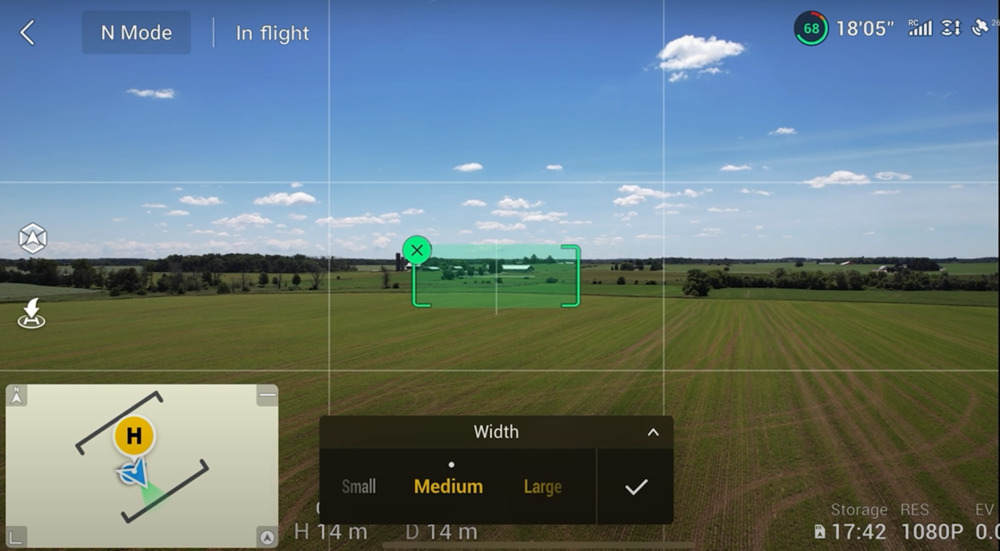
You will notice if we would adjust these settings and increase length, width and height that it takes to capture the best shot also increases rime calculated by the little counter.
DJI Air 2s Drone Obstacle Avoidance For The Master Shots
We have noticed most of the time if we are filming a best drone shot we get a lot of props and that’s due to the way the drone flies. So it still has safety in mind when we are flying for a master shot obstacle avoidance needs to be enabled to help prevent the drone from running into obstacles.

However when we are in master shot mode, go into the settings and there we can see we have the option for obstacle avoidance or composition. As we select composition it’s going to fly a little bit more traditionally but the downside of this is that you don’t have obstacle avoidance so it’s better to choose obstacle avoidance for the safety purpose.
Visuals of Obstacle Avoidance in Drones
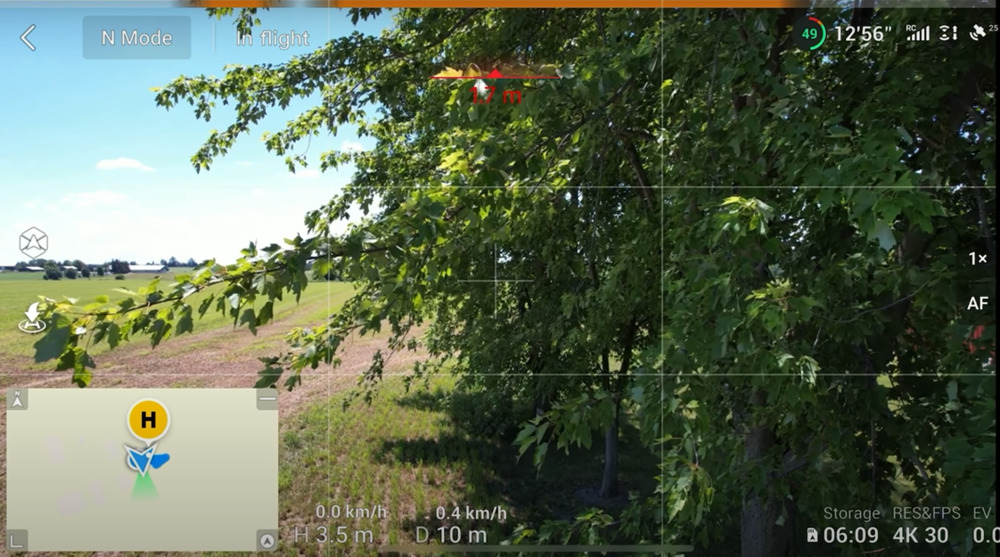
This one is definitely important to master in DJI Air 2s fly app settings. If you are new to these drones you will notice at the top and bottom of the screen the orange stripes representation of the obstacles. Those orange stripes will move around the screen depending where it detects the obstacle on what side of the drone they will also get larger. Now do the math. In order to set up the behavior of the obstacle avoidance feature we need to see what kind of obstacles we have ahead. It’s not possible every time but you can always change the settings for different obstacles in fly app.
Setting up Behavior of The Obstacle Avoidance
So this hack is really crucial in order to set up the obstacle avoidance behavior which plays a key role in many ways. We need to click on our settings and we go over to the top there we can see we have different options that we can toggle: we have a break which we can set it to bypass and when enabled the drone is going to try and find a safe route either around or above the object.
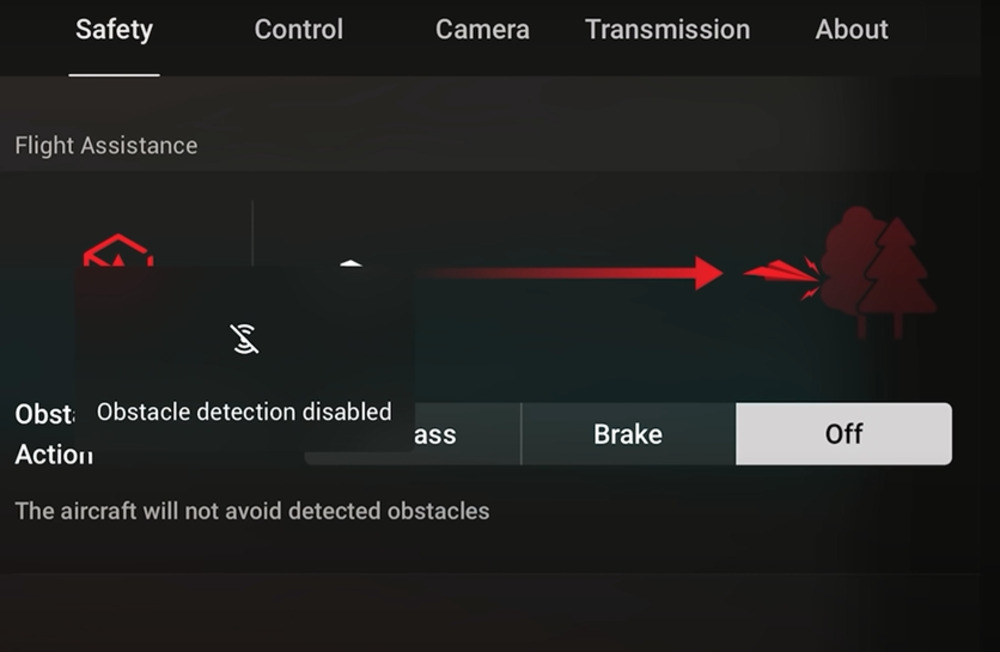
So definitely sometimes we need to turn it off for obstacle avoidance. While if we are trying to get in really tight to a certain subject perhaps we are doing some proximity shots and the obstacle avoidance is preventing us from getting too close as per se.
Setting up or Updating Home Point for DJI Air 2s
We need to do set the home point when the drone connects to satellites and it has taken off it’s already going to have a home set. However at any time we can go in and update our home point that we may need to.
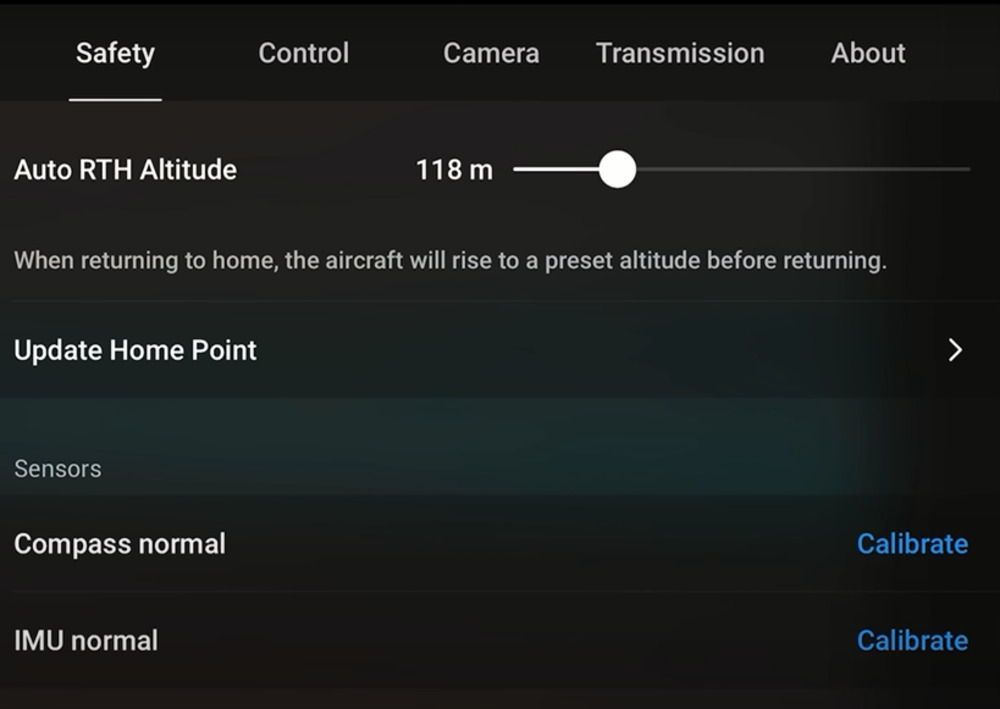
Perhaps you are in a park flying around and you have been walking as you are flying. You will want the drone to come back to where you are and not where you took off. So you can do this easily by clicking on the three dots and make sure you are under the safety tab. You can see there we have an option that says update home point. From there there are three different options on which you can update your home point.
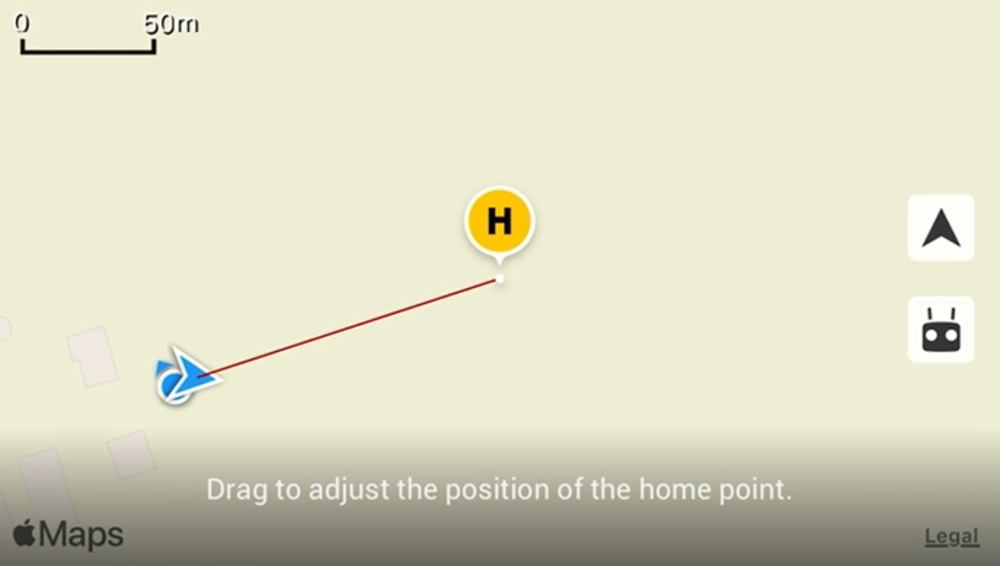
The first thing you can do is just tap on the three dots as you can see that is going to move you. We need to use caution when using that method because you really don’t know what you are setting your home point at. You could be setting it right above a tree or even a building.
So to avoid that ideally what you want to do is use the buttons on the right hand side you will see we have an icon and we have an icon for the controller. If you want to set the home point to if you want to set the home point to where the Aircraft currently is you would select the Aircraft. Once you exit out you will get a message that the home point has been updated to that selected point.
Tips to Adjust DJI AIR 2S Gimbal Speed
In this one we will learn to adjust the gimbal speed. Basically that’s the speed at which it moves up.
So again if we click on the three dots at the top right hand side we go to control. There we will see we have an option called advanced gimbal settings and from there we will see we have all different types of controls. But what’s important to note we will see at the top of each we have sport mode so that correlates to the flight Mode that we can also use to fly a drone at.
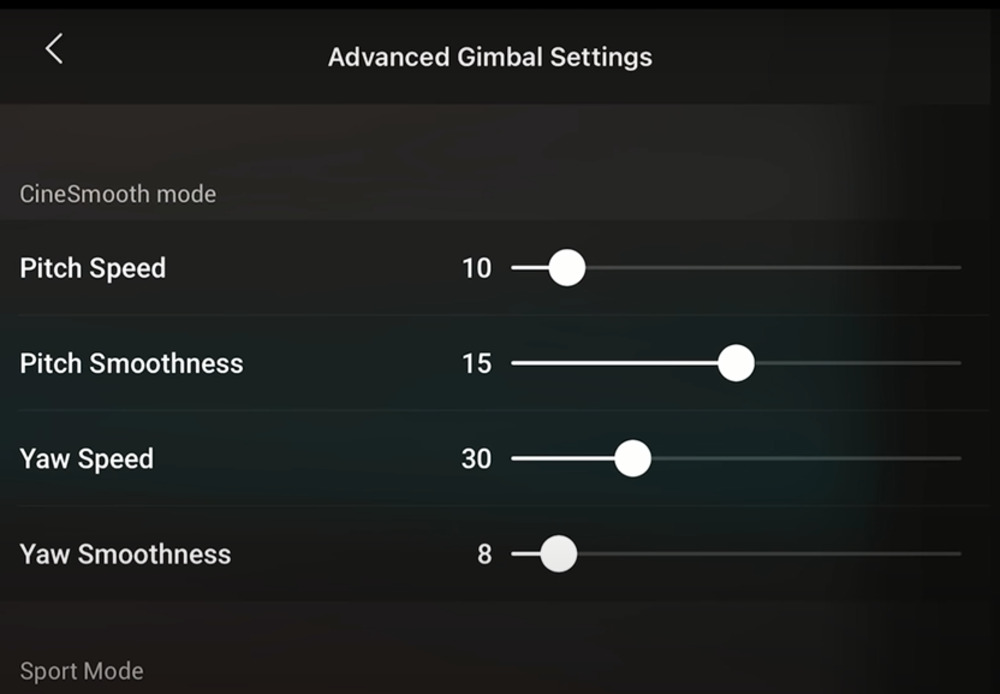
Cinesmooth Mode – We can also fly in Cinesmooth mode normally. From there we can adjust the gimbal according to each mode. For example if we are in Cinesmooth mode we might want the gimbal to move up and down really slowly for a nice cinematic look.
Sports Mode – While in Sport Mode maybe we want to move a little quicker because we want to capture the moving action. So we would just need to adjust the sliders according to what and how we like. Sometimes it takes a little bit of playing around though.
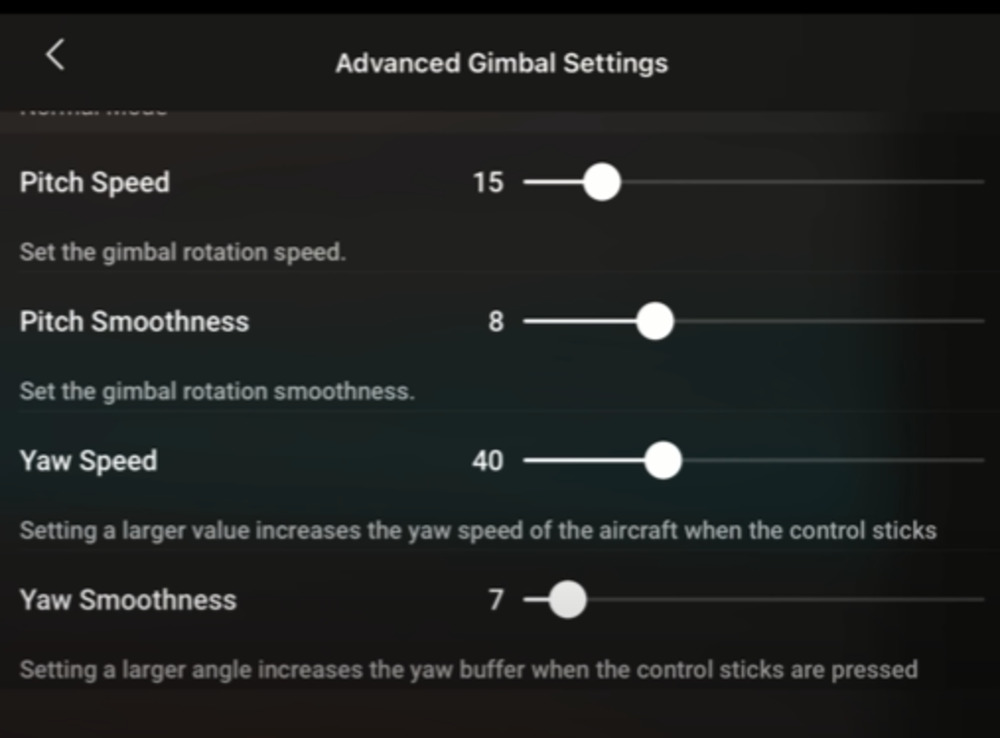
(I) The first option is pitch speed that means how quickly it moves.
(II) The next option is the pitch smoothness, that’s how quickly basically it comes to a stop when you stop spinning the dial how quickly it comes to a stop. One thing here is very important to understand that the Air 2S can move the camera from side to side.
(III) We can also set the speed as well as we can fly it at the default values. They are not too bad. Of course we can also adjust at which position the gimbal moves just by moving it but sometimes if we are flying a complex maneuver while trying to move the camera down. Sometimes it’s a little bit hard to do it all at once, which is also not suggested here, so by slowing down that gimbal we are not going to mess it up as compared to just moving the gimbal jump up or down.
Setting Up Drone Flight Status Setting Menu
So let’s say our drone is in the air or on the ground, we can always adjust the flight manual by just clicking on the flight status which is again a cool feature in DJI Air 2s that we can easily toggle from the app. From there we can also see some basic information about the safety settings for return to home altitude or even the max altitude of flight. It’s just a nice quick way to verify those settings instead of bringing up the full menu
Battery Settings
The battery aspect is a very important one for every drone. So if we click on the battery level icon as shown in the picture and it’s going to show us more details such as it’s going to auto return to home and when it’s going to force to land.
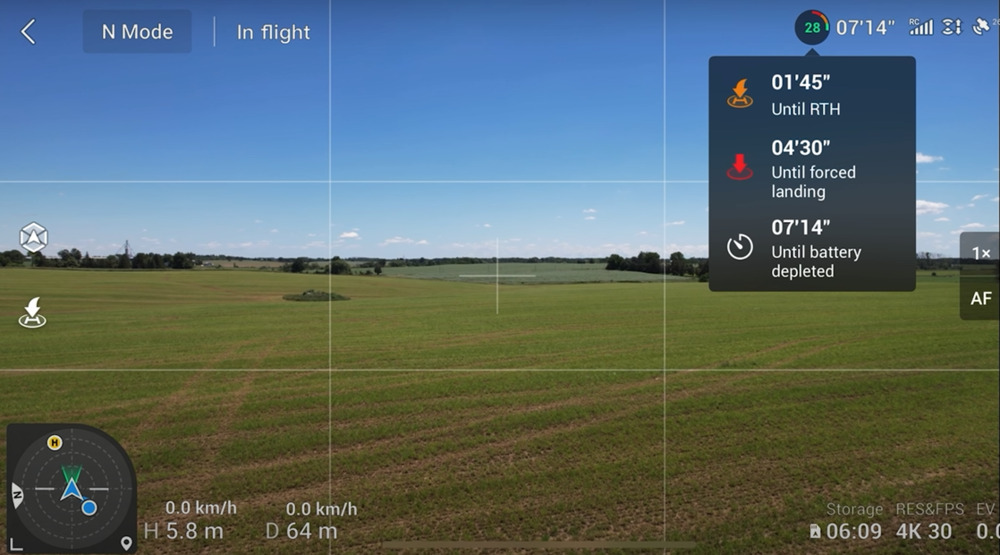
Those values will adjust depending on how far we are away from our home point. Suppose if the drone is quite a distance away from the home point it’s going to return to home a lot sooner and so on.
GPS and RC Settings in DJI Air 2s App
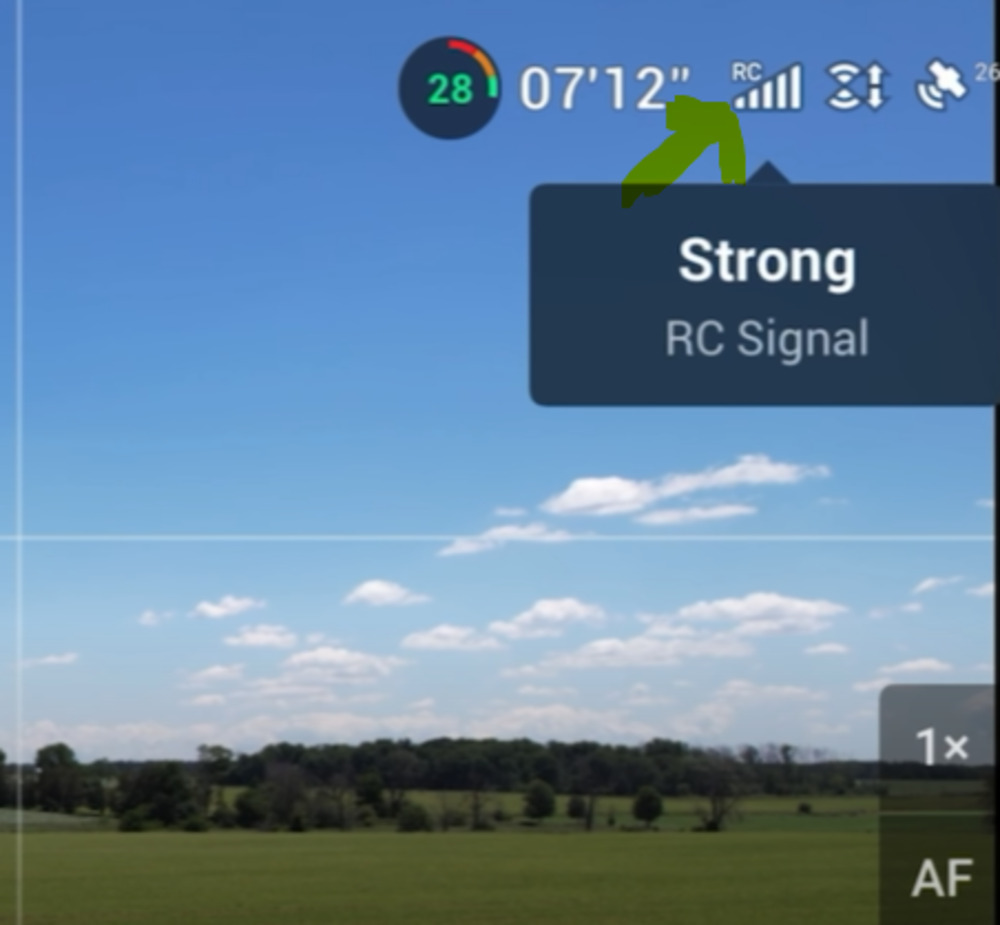
We can always adjust these three settings which are important as per our requirements. We need to click on the three icons at the top of RC and the satellites. We can click on them at any point and it will bring up more. It’s a good idea to check that out once in a while just to make sure everything is as it should be to just be on the safe side while flying our DJI AIR 2S.
Activating Pro Mode on Drones
This pro mode drone setting hack really makes a difference in the performance of DJI Air 2s which can always as we want it to. If we see at the bottom right hand side of the screen on our Air App it says auto. We need to click on it. It’s basically with pro mode we can click on and adjust our settings.


We will notice right beside it that means that’s still an automatic and that’s a really nice feature running it Pro Mode on Auto. We may go in tweak settings and adjust it if we want to. But if we leave these options for white balance etc automatic with the way they have it set up we can leave some of the automatic and just adjust the ones that we want to change.
Setting up Map View on DJI Air 2S
Mapview is another very useful feature in the fly app of DJI Air 2s that we need to toggle for desired results. So here for this one we are going to talk about the map view. First of all if you tap on the screen you see at the bottom left a small icon. If we tap that you will see it’s going to become much bigger.
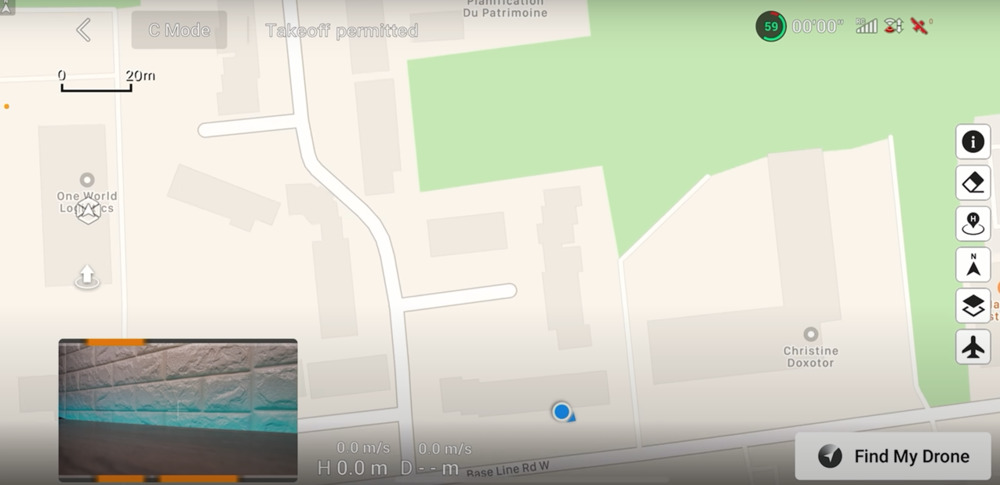
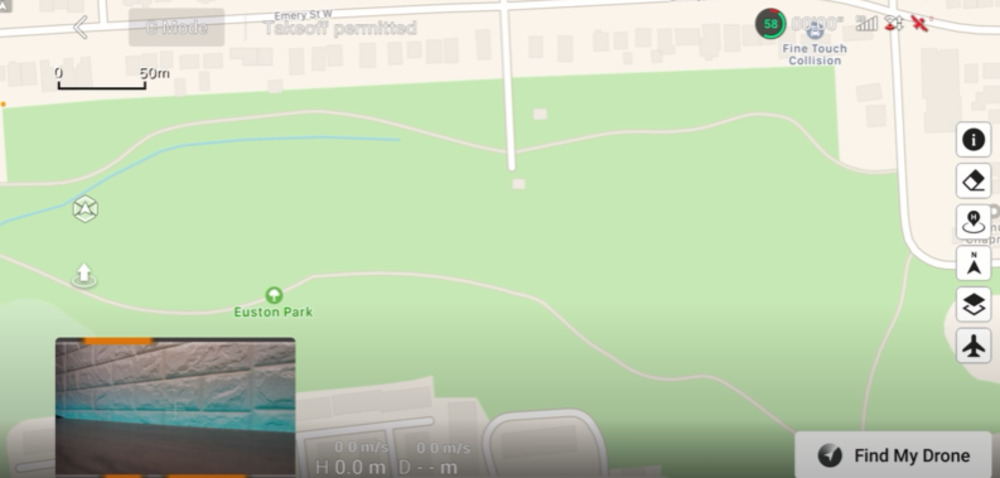
It will just give us a quick preview of from there we can tap on it and that’s and we can scroll around to look at different areas. One nice thing about the map view is it’s going to show us where we are. So if you have the drone up in the air and you have been flying for 10 minutes. It’s going to have lines on the screen showing us exactly where we have been.
This can come in handy. If we ever lose our DJI AIR 2S up in the sky we can just follow our path back home. We can also use the find your drone if we get lost somehow. If it’s crashed we can also switch that map.
If we click that little icon on the very left we will see it turns into what DJI calls the attitude indicator. It’s going to show us where the drone is.
If you will keep your drone and controller together to check, that way you know which way the drone is pointing compared to the lost one again it will help us make it come back or find it. If we get disoriented those two white lines on either side is also the angle of the drone up in the sky.
So if it’s a windy day and we are flying it will show us how the drone is moving around up in the air and again with it if you find it’s in your way you can minimize it.
Enabling Zebra Stripes Feature in DJI Air 2s app
We always want different set of results for our footage. As sometimes it’s a good idea to enable your zebra stripes settings. Basically that will show us when things are overly exposed for no good reason. To adjust our Zebra Stripes settings all we need to do is to go into settings, scroll down until we see that overexposure warning.
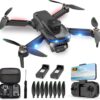
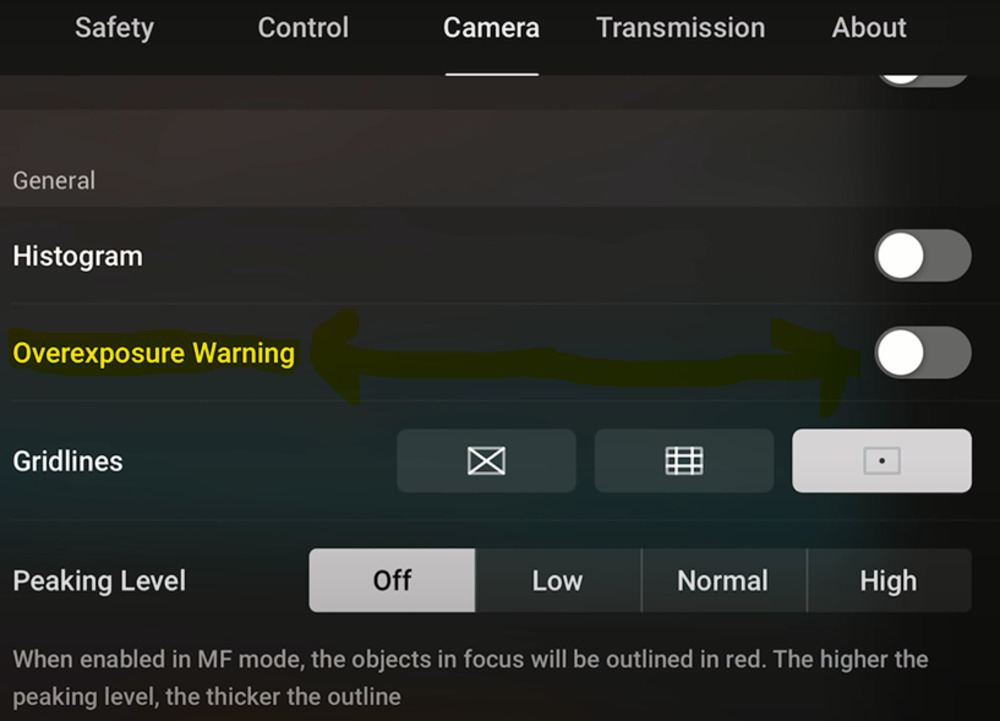
We need to enable it. Once we enable it then we can come back and see there if things are overexposed. We will see zebra stripes on our screen. Then we can use our ev compensation to adjust the exposure to get a nicer view.
Enabling Gridlines in Dji Air 2S
Gridlines are considered differently by different experts as some really don’t like them. We can enable gridlines again if go to settings under camera. We will see there usually most of us have the horizontal gridlines enabled. We can also enable that center point crosshair. That crosshair in the middle can sometimes help us align our shots.
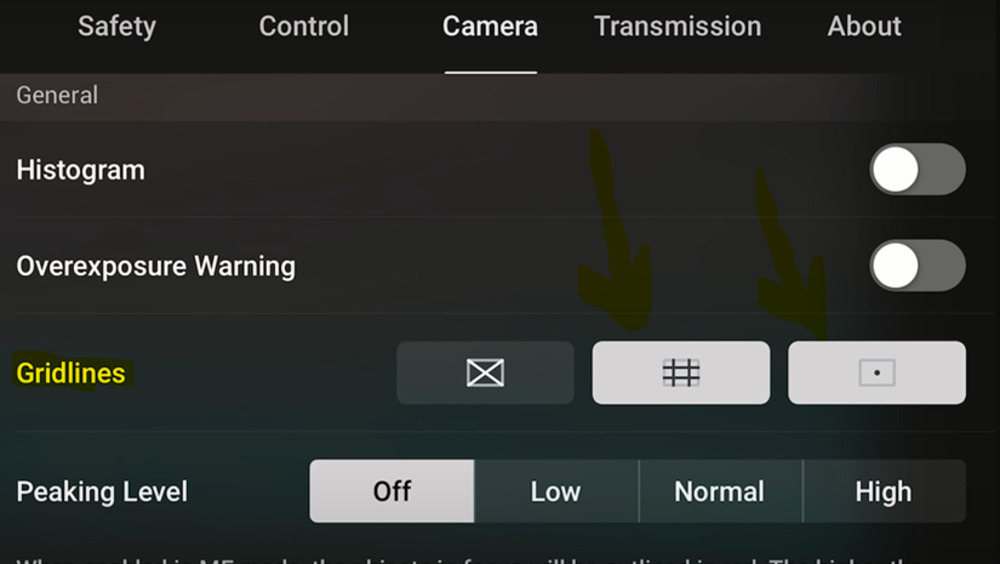
Once again the gridlines can definitely assist us in lining up our shots especially if we would like to follow the thirds.
On the contrary, some people don’t like to have the gridlines enabled as they find it distracting. So it might be one of those things where we just turn on.
Enabling AirSense in Dji Air 2S
So if we want to understand what AirSense is, basically it is a technology that DJI has built into the drone to help detect if there are any Aircraft in the area. Now for most people it’s disabled by default. So we do need to turn it on. We can do so by going into the settings.
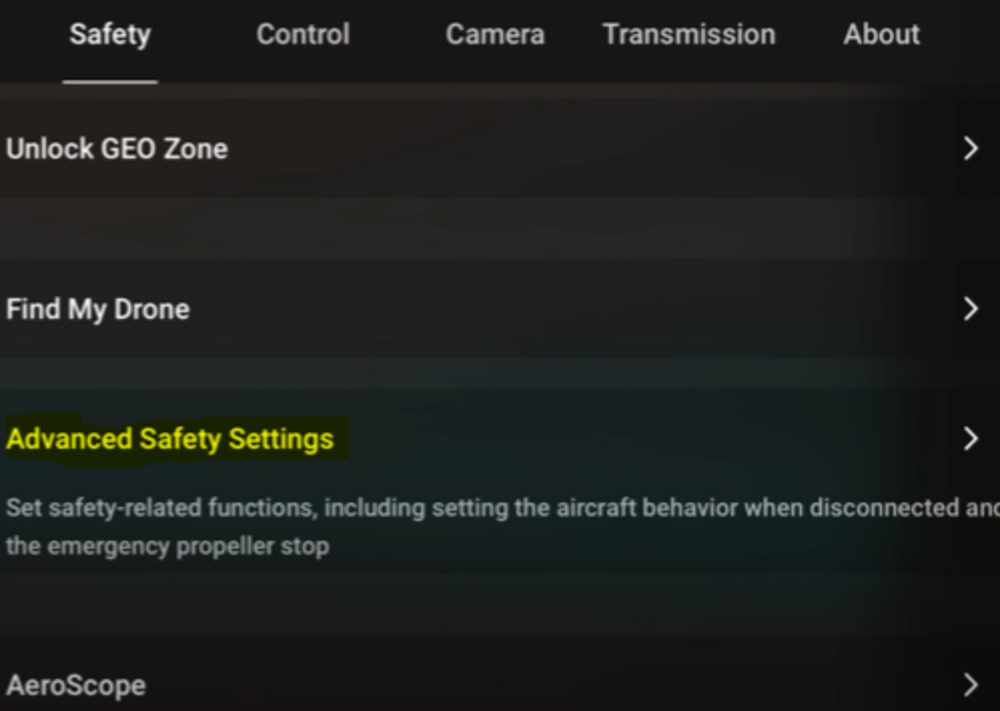
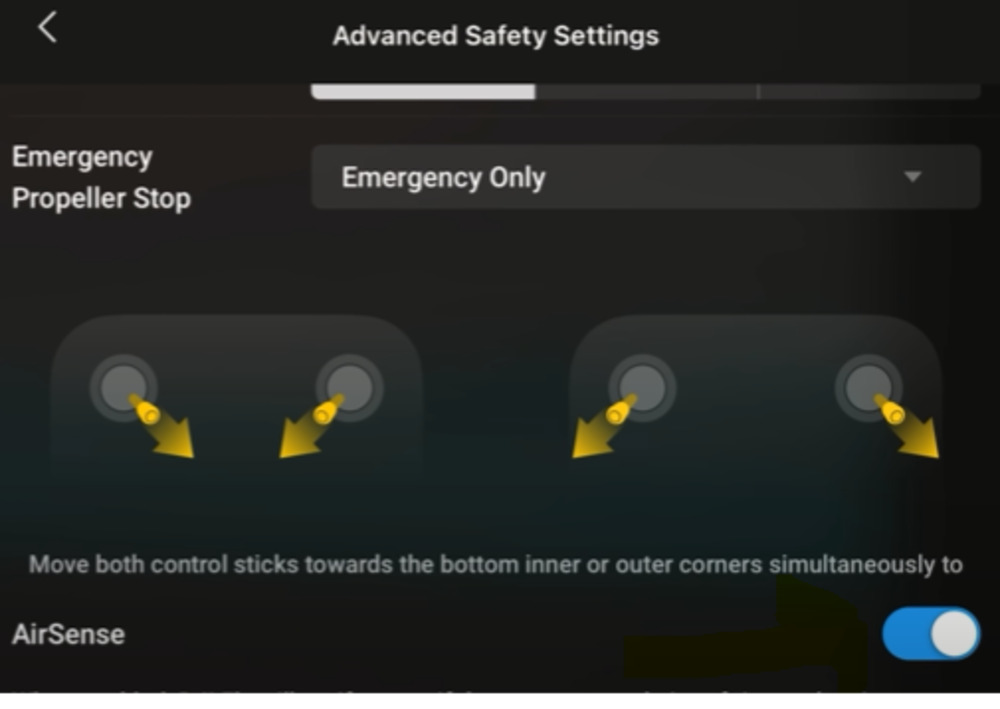
So again we need to make sure to be under the safety tab. Next we need to scroll down until we see the option advanced safety settings. When we click on it we will see that it’s turned off. So if yours is disabled turn it on to be on the safe side. It’s necessary to enable the AirSense before flying DJI Air 2s when we are in the open.
Subject Scanning Settings in DJI Air 2s
Basically what that’s going to do is to automatically pick up cars and people and put little icons on the screen for us to see if we want to. That way we can quickly go in and follow them if we want to, which we have seen in a lot of car chases in movies.
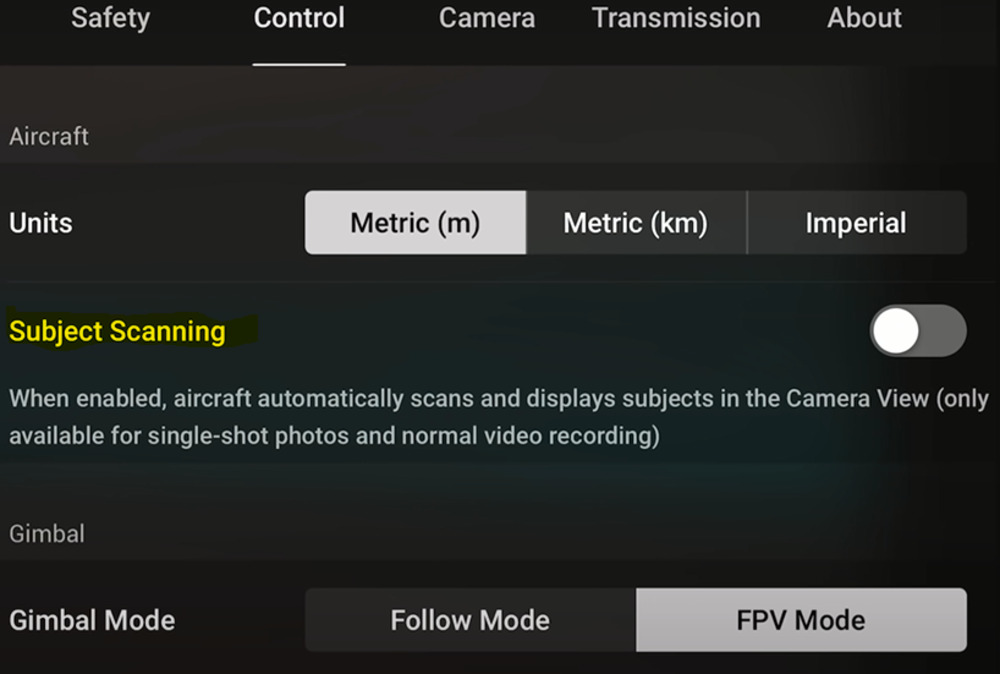

In order to turn that on we need to go into our settings, then go over to and there we can see that it says once it’s enabled you will notice people and cars icons to follow and it does it in real time. So as the drone moves around and more people come into frame. if we want to do something like that it’s definitely a handy feature to leave on. If we don’t want to do any following and tracking then sometimes it can be a good idea to leave it off being distracting. All these DJI AIR 2s tips and tricks are at our discretion that we either want to change or leave.
Function Button Settings in DJI AIR 2S
So for this one we need to set up the behavior of the function button. By default a single press will turn on the LED on the bottom of the drone, a double press will point the gimbal depending on what position it’s in. But if we can go into the settings and customize it however we want.
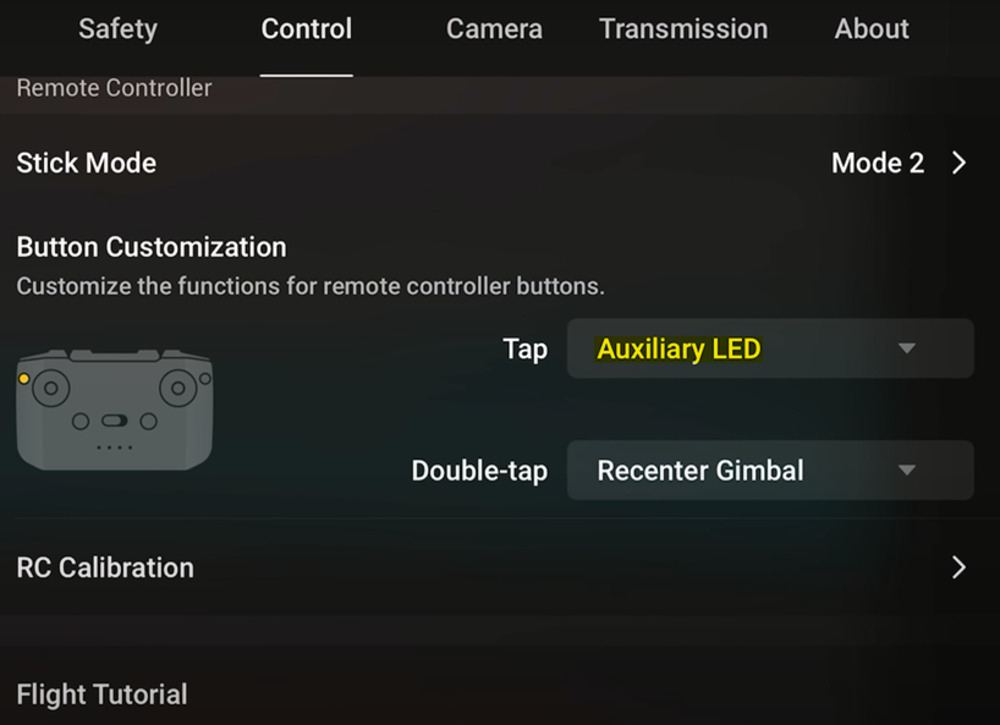
So to customize the functions button we need to go to control, scroll down and there we will see we have this option for function button customizations.
We can customize a single press or all we do is to select the drop down menu and we will see there it gives many other options depending on our discretion to choose from. We can set them up from there.
Setting up Signal Transmission
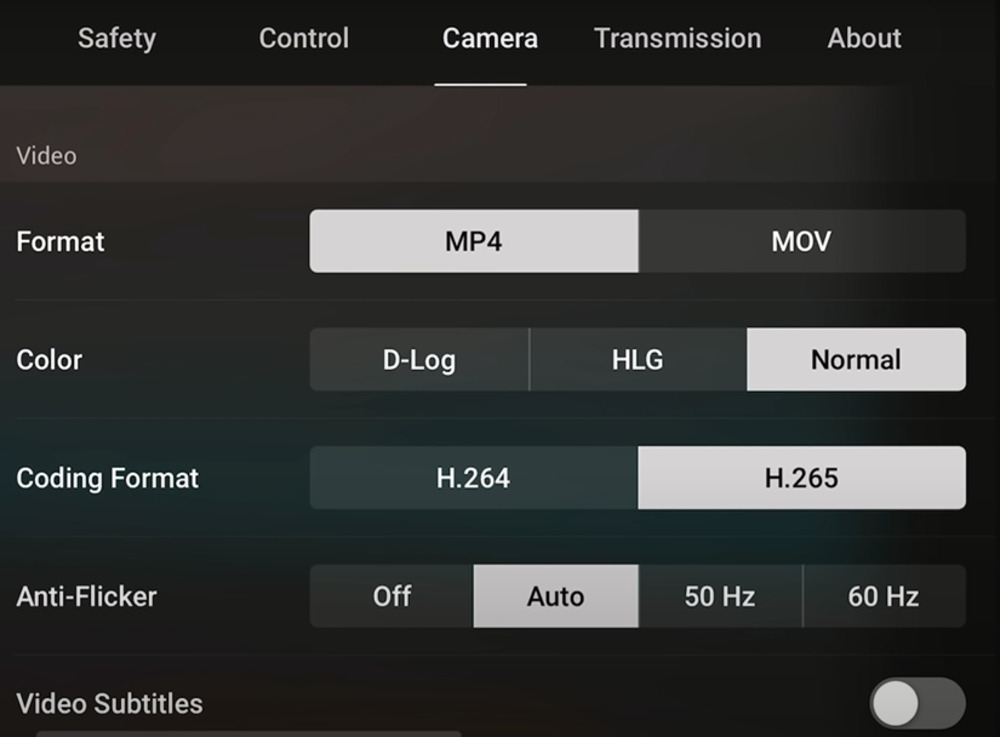
So we can really change the signal transmissions and set it to smooth or HD. So let’s go into our settings and at the top there if we go over to the top you will see we have smooth or HD options.
The HD gives us the most detail when filming but if we are going to be flying and our signal strength gets a little weak we can always switch it over to smooth. It seems to lock up a bit but it will always give us a nice clear picture.
Video Zooming in DJI Air 2S Fly App
For drones without zooming in on something is worthless. We always need to zoom on objects and people we want to. There are four different ways to use our video zoom feature in DJI Air 2s flying app that we can change if we want to. We can click on the 1x button and there we see it goes to zoom 2x, if we press it again it zooms 4x. So basically this is how we can toggle zoom feature on fly app for DJI AIR 2s. We can also hold on it and keep it pressed to get zoomed further.
D-Log Filming
So D-log is another great feature in the Fly app that has its potential usage for filming. So we film in a flat color profile. It allows us to go in and for the most part we can get better dynamic range and a better image quality. However the preview on the screen is going to look very flat as well. Some people can find that a little bit distracting. So when flying with a recent
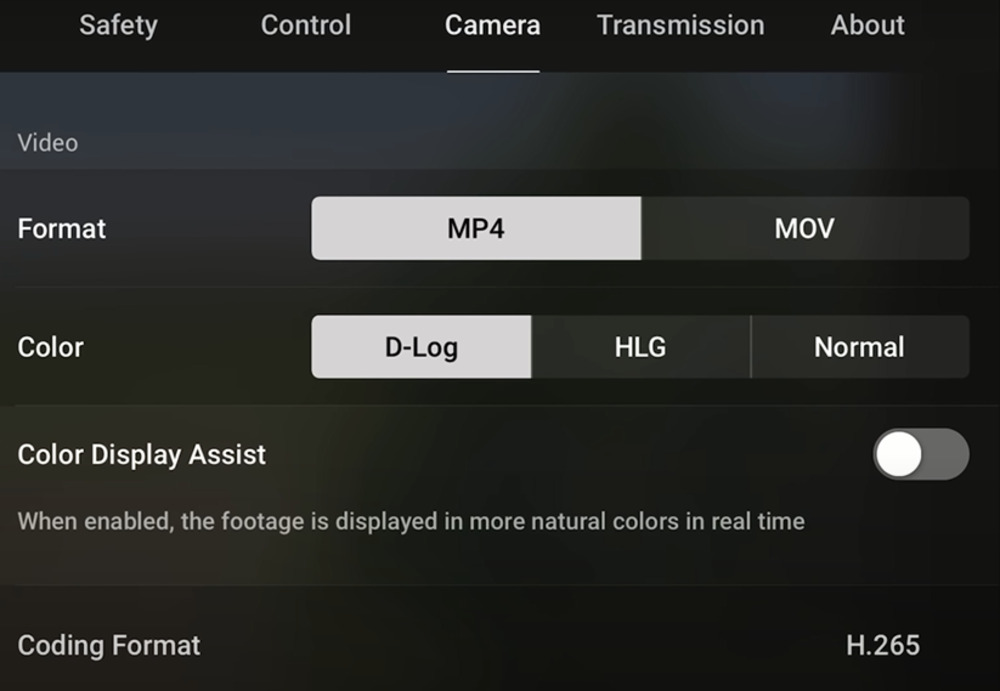
update DJI’s built-in a feature to allow a real-time preview of what it would look like color graded once finished.
All we need to do is to enable that when we switch over to d-log just make sure you enable it as you will see there it will give us a more natural preview of what we are filming but the recorded video will still have that flat look. We suggest using it just for the preview.
Sideways Flight
What we notice while turning sideways flight on is we get the new option that says “disable sideways flight”. If it’s enabled the drone is liable to move only forwards, it may move up/down but it would not move sideways. So it has its own typical uses, we always want the footage from sideways if we need to.
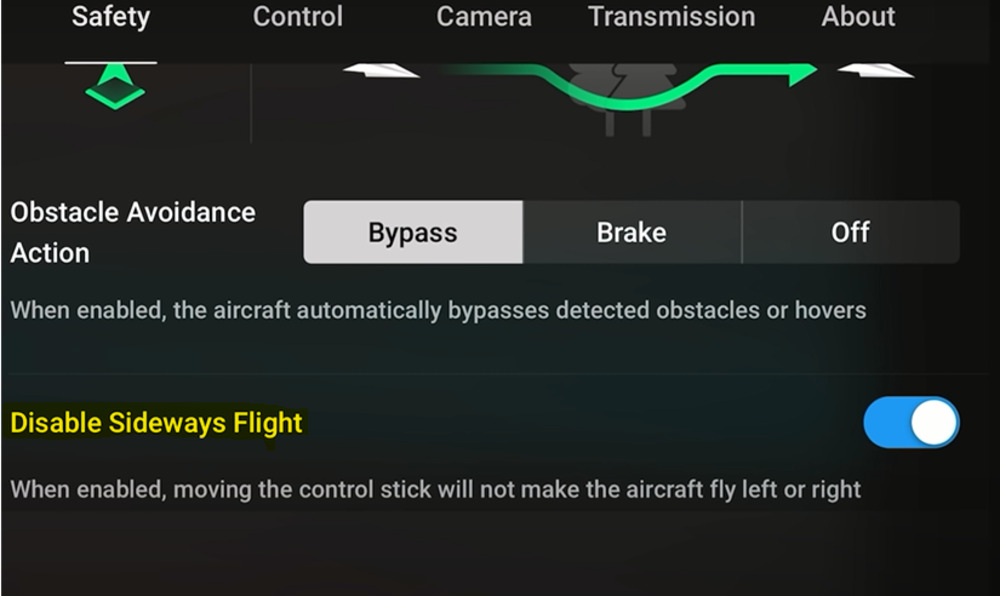
We can always use this option to disable or enable sideways movement of our DJI AIR 2S from the fly app.
DJI Air 2S is the best drone at this point or probably one of the best available drones that we see these days on market. It also requires expertise to use its featured to the fullest for the best drone shots. This guide about DJI Air 2S features explains everything about it. After changing these settings in the fly app we can easily compare its performance with other drones even without using them.